Cookie Policy
To enable the best browsing and shopping experience, we ask you to accept a variety of cookies for functionality, performance and targetting purposes.

Click 'Allow Cookies' to accept all cookies. Or click 'Manage Cookies' to choose your preferences, and read more about our cookie policies.
Allow Cookies
Manage Cookies

How To Tie Shoe Laces:
A Step By Step Guide

How To Tie School Shoes

As a kid, learning to tie your own shoe laces was probably one of your proudest moments. Laces aren’t the easiest form of fastening when it comes to children's shoes, especially when they’re eager to get on and do what they’ve got to do.

With that in mind, teaching your little one to tie their shoes as early as possible can be a massive help when it comes to calming your nerves and theirs as they start their journey through school. Understanding how to tie school shoes can be especially useful when you can’t be around during class to do it for them.

There are a vast array of methods out there when it comes to tying laces, some are hugely complex and more of an art form, which are probably best reserved for later down the line once basic skills have been established.

Here, we’re going to take a look at some of the simpler methods of tying shoe laces that will help children gain a better understanding of how to tie a shoelace step by step with minimal fuss:

Simple Method: Bunny Ears

Simple Method: Bunny Ears

Probably one of the most well respected techniques when it comes to teaching kids how to tie shoelaces, the Bunny Ears method creates a square knot and is probably one of the easiest to learn. Follow the super easy steps below for the perfect bunny ears knot:

Step 1 — Take one lace in each hand, holding them in place with your thumb and index finger.

Step 2 — Keeping hold of each lace, cross them over each other to create an “X”, now tuck the top lace under the bottom lace and pull it through, this will create your starting knot. The lace that started on the left should now be on the left and vice versa.

Step 3 — Next, create a “bunny ear” with each lace. Again, cross the “ears” over to create and “X”. Take the bottom “bunny ear” and loop it over and then under the top one to create your first knot.

Step 4 — Once the first knot is secure, pull the ears to tighten the knot. Step 3 can then be repeated for added security if needed.

And voila! A perfectly tied and secure pair of shoelaces that can be undone easily with a simple tug on the ends of the lace (it can be slightly more difficult if using a double knot).

TOP TIP: When teaching your little one to tie laces, opt for round laces rather than flat, this will make the process easier and they’re less likely to snag when untying.

We've got the school shoes you've been looking for...Shop Now

Single bow shoelace knot

Classic Method: One Loop

Got a brand new pair of shoes and want to know how to tie a single bow shoelace knot? Take a look at the simple steps below:

1. Start with your shoelaces untangled and even in length.

2. Cross one lace over the other, creating an "X" shape with the laces.

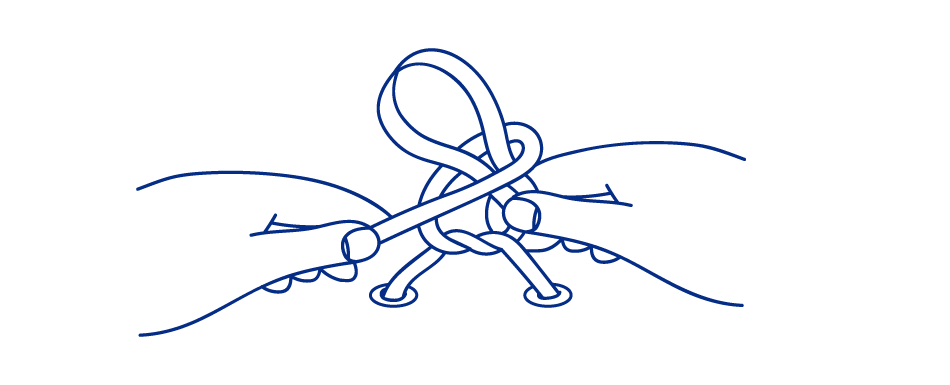
3. Take the lace that was underneath and wrap it around the other lace. This will create a loop.

4. Feed the end of the looping lace through the hole created by the "X" and pull it through. This will form the first half of the knot.

5. Now, take the lace that was on top (the one that was not used for the loop) and create a second loop.

6. Pass the end of this second loop through the hole created by the "X" in the opposite direction (from underneath to on top) and pull it through. This will complete the knot.

7. To secure the knot, hold onto both loops and pull them tight. Make sure the knot is snug but not too tight to allow for comfort.

8. Finally, adjust the loops and ends of the laces as needed to make sure the bow is even and looks neat.

That's it! Now you’re ready to take your new trainers out for a spin.


Double bow shoelace knot

Classic Method: One Loop

But perhaps a single bow is not enough, and you need that extra support. Why not try out a double bow shoelace knot? For the most part, the same rules as the single apply to the double bow. There are just a few extra steps that follow:

1. Start with your shoe laces untangled and even in length.

2. Cross one lace over the other to create an "X" shape with the laces.

3. Take the lace that was on top (the one that didn't cross over) and wrap it around the other lace, forming a loop.

4. Pass the end of the looping lace through the hole created by the "X" from underneath. This creates the first part of the knot.

5. Pull both ends of the laces to tighten the first knot, but do not fully tighten it.

6. Now, create a second loop with the lace that was originally on the bottom.

7. This time, pass the end of the second loop over the first loop and through the hole from the top. This forms the second part of the knot.

8. Pull both loops to tighten the second knot, ensuring that it's snug.

9. To secure the double bow, hold onto both loops and pull them apart from each other. This tightens both knots and prevents them from coming undone.

10. Adjust the loops and ends of the laces to make sure the double bow looks neat and symmetrical.

And there you have it, a secure and reliable bow.

TOP TIP: If either of the loops go too far and come undone while pulling, STOP! Continuing to pull will cause the knot to get stuck and will be harder to undo. To release it, simply pull the end of the lace for the loop that is still in tact.

Extra Tips

Tips for teaching kids to tie their shoe laces

There are a few things that can be done to help kids learn when it comes to tying their school shoes. Some of the best tools to use are pipe cleaners, they make a fantastic alternative to laces when first starting out, the extra rigidity means they’re much more likely to stay in place when practicing.

Child Tying Shoes

You could also create a practice board. Take a piece of cardboard and draw a bird's eye view of a pair of shoes, you could even encourage your little one to decorate them if you wish. Pierce holes where the eyelets would be and then thread a pair of shoelaces through as you would on a real pair of shoes. This is a great tool for your little one as it means they can also get creative with different lacing styles too.

Teaching kids how to tie their school shoelaces can be a fun and creative journey. Here are some kid-friendly ideas to make learning a breeze:

1. Pipe Cleaner Practice: Start with colourful pipe cleaners! They're like magical laces that don't slip away. Let your child practice making loops and knots using these. It's a great way to get the hang of it.

2. Crafty Shoe Board: Create a special practice board together. Take a piece of cardboard and draw a picture of a pair of shoes from the top. Encourage your little ones to decorate them as they like. Make holes where the eyelets would be on real shoes and thread laces through, just like the real deal. This not only helps them learn but also allows for some creative lacing styles.

But remember, encourage them to practice and celebrate small victories. With patience and praise, they'll master this essential skill, ensuring their school shoes stay snug and secure for all their adventures.

Lacing Methods

Shoe Lacing Methods

There are probably hundreds if not thousands of different methods when it comes to lacing up shoes and experimenting with different styles is definitely part of the fun when it comes to learning to tie shoelaces.

When you’re teaching your little ones how to lace school shoes, the most common methods of lacing would be the standard criss-cross lacing and the straight bar lacing. Both are simple to do and look good when the shoelaces are tied.

The most secure would be the criss-cross method. As the name suggests, this method interlocks the laces as they pass through the eyelets from right to left in a zigzag pattern. This allows you to have more control over how tight or loose the laces are on the foot.

The straight bar method, though perfectly suitable for use in children's shoes, is more fashion led and doesn’t quite offer the same level of control over tightness as the criss-cross method does. They do however look smart and tidy, making them most suitable for formal or dress wear.

Conclusion

Conclusion

Teaching kids how to tie their school shoes is one of those tasks that may seem like an impossibility, but with a straightforward technique, simple tools to help them get sorted and a huge amount of patience, we’re certain they’ll get there in no time at all!

Shop Easy Lace Up School Shoes for Less…

Independent kids will love tying their own shoelaces, so why not choose a pair from our Back to School range online?

Shop Now